Pages

Like it? Then share it!

Sunday, October 18, 2015

Matcha (Green Tea) Red Bean Muffins

So... it has been a while. Too long in fact since I've posted anything here. It's so weird that it's all starting again. Provided all goes well, we may just see more posts here.

We just celebrated another Youth Sunday at church today. The muffins were a huge hit at our last Youth Sunday and so as a team we decided to carry on this 'tradition'. This time round we had a team of five awesome ladies sharing their baking skills and ended up with the following menu:

  1. Coffee and Pecan
  2. Lemon
  3. Blueberry
  4. Red Velvet
  5. Carrot and Honey
  6. Banana and Walnut
  7. Green Tea and Red Bean (*)
  8. Double Chocolate (*)
Needless to say, I did the Double Chocolate and (as you could have guessed from the title on this blog) the Matcha (Green Tea) Red Bean Muffins. Research didn't find me a recipe that used sour cream. I have this thing with muffin recipes, one that it must use sour cream and two, it must be a one bowl mix (i.e. that it doing require creaming of butter). 

My Chocolate Cupcake recipe satisfied those requirements. So instead of using the cocoa, I substituted it with green tea power and added red bean paste (store bought). Both cocoa and green tea  power are bitter so I took a gamble in using the same amount of green tea powder. And it turned out brilliantly. Although credits to the green tea powder I purchased from my local Bubble Cup store (which is an Asian Sweet Tea shore). I was so blessed that they were willing to give me a packet of the green tea powder they use to make their teas. They also shared their Taro Powder (Yay!!) which means I will be testing it out soon!! 

Going off on a tangent, Cupcake Central (Melbourne, Victoria) have been selling all kinds of Asian influence flavoured cupcakes. Just a few weeks ago, they had Pandan and then Taro. It got me inspired with my muffins. So I'll try out the taro powder and post about it later on- just keep watching this space. 

I would have taken photos of my green tea red bean muffins but laziness took the better of me so I didn't have HD resolution photos to post (DSLR needs to be dusted and brought back into action). Instead, you can jump onto my instagram (@mamabea) for a somewhat 'alright/'postable' shot. 

Recipe as follows:  

Matcha (Green Tea) Red Bean Muffins.Ingredients A
1 cup Caster Sugar
1 cup Self Rising Flour
1/3 cup Matcha Powder (aka Green Tea Powder)
3/4 tsp Baking Soda (Bi carb soda)
1/2 tsp Salt

Ingredients B
1 Egg
1/2 cup Sour cream
1/4 cup Vegetable Oil (or a non scented oil)
1 tbsp Vanilla Extract (I like to be very liberal with the amount of vanilla I add in)
1/2 cup recently boiled water from the kettle

Ingredients C
1 can Premade Red Bean Filling/Paste (aka Adzuki Beans)

Method
1. Preheat the oven to 180C, and line one muffin tray with cupcake liners. Note that this recipe makes 10 big cupcakes and approx 12 average sized cupcakes.
2. Place all ingredients A in an electric mixer. With a whisk attachment, on a low speed mix the dry ingredients until there is no lumps remain.
3. In a measuring cup, place all ingredients B together and whisk until well incorporated.
4. On a medium low speed, gradually incorporate the wet mixture in the dry ingredients. When all incorporated, mix until the batter is smooth. Be careful not to over mix as it will dry out the cupcakes. Then fold in the Red Bean Paste/Filling until evenly incorporated. 
5. Using a standard ice-cream scoop, evenly fill each cupcake liner with the batter.
6. Bake for 15-20 minutes or until cooked and golden on top.
7. When removed from the oven, let the cupcakes to cool completely  in the pan before taking them out of the cupcake pan.

Let me know what you thought by commenting below! I would love to hear from you all and your experiences baking my recipe. 

Happy Baking!

Sunday, November 23, 2014

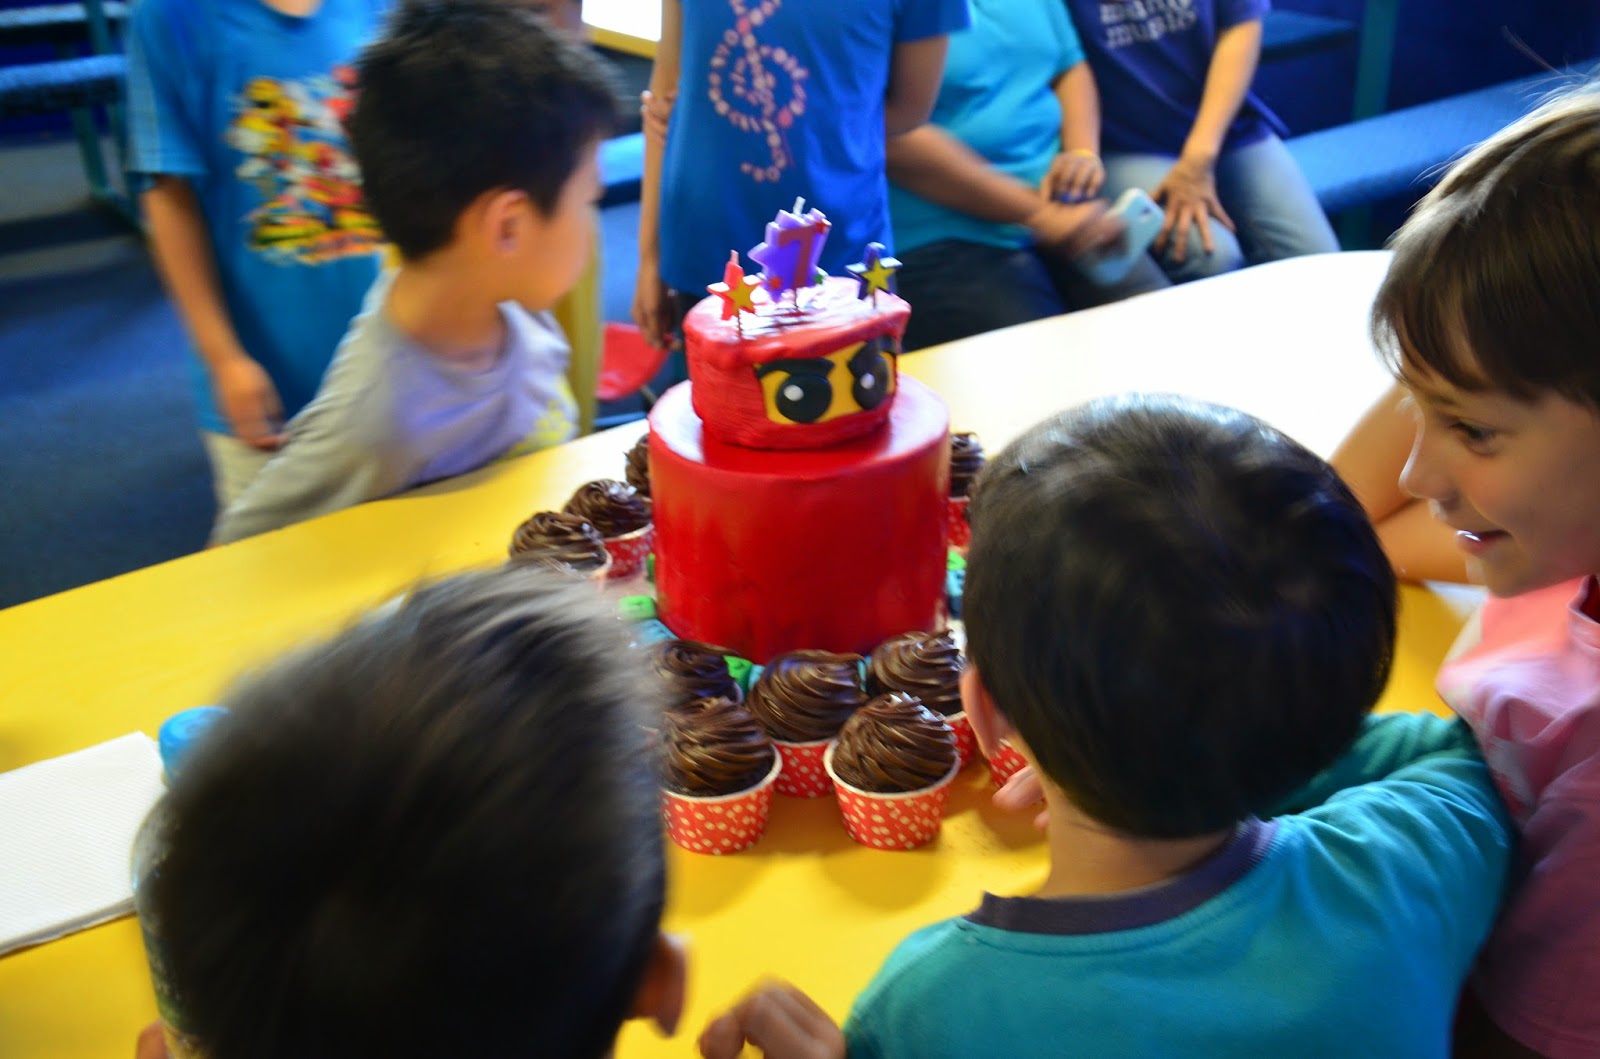
Ninjago Cake for a special kid's seventh birthday


Tah dah! The much awaited post is finally up. After weeks of research and preparation, I introduce to you all the Ninjago Cake. Thoughts? Well, I can let you know that the kids received it very well, too well in fact that they all wanted a price of the sugar legos that were placed around the cake. Thank God the Birthday Boy was able to calm them down. 

The weather was too hot for my liking leading up towards the day of the party. The humid weather made it difficult to handle the rolled fondant that I had purchased. Particularly the Red Fondant used to cover the entire cake. It kept breaking as I was trying to lift it even though I had worked a bit more corn flour into it to stabilize its consistency. In the end, I just worked with baking paper and flipped the rolled fondant onto the cake. I must say the fondant smoother is God send it comes to smoothing down the rough edges. So we got there, eventually. 

So what lies beneath the rolled fondant. I used a dense, fudgy chocolate cake recipe that did not call for any eggs. It was vegetarian friendly, not nut friendly because the chocolate that was used to bake the cake did say it may contain traces of nuts. Two seven inches were used for the bottom layer and one five inch was used the the top. This cake was meant to serve only 30 people. But I would say, after baking it, that it could easily serve 40- 45 people given that the cake was awesomely rich. 

I didn't want to use buttercream this time round to ice the cake. Only because my favourite recipe is the old fashion buttercream, which uses icing sugar, milk, vanilla and butter. To achieve a smooth finished, I thought chocolate ganache would be a better choice. And indeed it was. It was easy to work with as both and icing and filling for the cake. Because dark chocolate was used, it balanced out the sweetness of the cake. Overall, the cake was moist, fudgy and not at all sickly sweet. Comment below if you would like me to share the recipe. 


As for the design, I simply search on Google for other examples. And by combining the designs, I came up with this one. Less is more hence I kept the design simple. The intention was for the spotlight to be on the top tier and that was achieved.

As for the height of the cake, it would be been around 30 cm.

You may also see from the photos that I also used my favourite chocolate cupcake recipes to make cupcakes to surround the cake. It could have been decorated with more sugar legos, but I just kept it simple with piped swirl using ganache.


I'm definitely looking forward to doing more of these novelty cakes. What I look forward to baking next time round is a princess cake with a dome cake for the dress. Can't wait for an order of that kind to be placed.

Have more questions in relation to this cake? Comment below as I look forward to helping out.

In the meantime, happy baking!

Sunday, November 9, 2014

Simple Recipes- Korean Spicy Rice Cakes (Tteokbokki)

I was running errands Friday evening and was asked to pick up some pre-made kimchi at my local korean groceries. What I love about this shop in particular is that they have fresh rice cakes available for sale. If you're lucky, you may also run into some fresh sweet rice cakes, which is a korean dessert, or korean sushi (Kimbap).


A tip with these fresh rice cakes is that if you don't intend to cook with it the same day it's purchase, throw it in the fridge if you gonna use it within the next two to three days. If you just want to stock up, then chuck in the freezer and defrost it when needed. Mind you, the one that I purchase came in a kilo. What I would recommend is that you portion it however much you want, and freeze the remainder until you decide to cook with it.

So being a Sunday evening, I decided to stay in to wind down and get some me time. The Boy stayed behind at church to help out with the Christmas production we have on 7 December. I had skipped lunch due to a late breakfast and a famished from something hearty and full of vegetables/seafood. (Note to you all, I am a Pescetarian.). With limited items to cook with, I decided it'd have to be Korean Spicy Rice Cakes. The fact that the recipe does only focus on rice cakes means that this recipe really doesn't call for much but for rice cakes and some staple vegetables that we would normally stock up with in the fridge.

Note that I have my take on this dish, and have added and taken out some things. I didn't have any onions, carrots or cabbage in the fridge hence the only vegetable used was chinese cabbage (which is the is the vegetable used to make kimchi).

Other ingredients you will need include: korean fish cakes (which is generally found in the freezer section of the any good korean grocers), dried large anchovies (which is also found in the freezer section. You can substitute this with anchovy powder which can also be found in korean grocers), korean hot pepper paste (aka Gochujang) and dried seaweed (also found in korean grocers).

My recipe goes as follows:

STEP ONE- Ingredients A: The hot paste mix

  • 2 tablespoons Korean Hot Chilli Paste
  • 2 cloves of garlic (chopped and minced)
  • 1 knob (size of 1 clove of garlic) of ginger (chopped and minced)
  • 1 tablespoon Honey 
  • A dash of sesame oil 
  • 2 teaspoons salt 
Method: Combine all ingredient A in a bowl and mix until combined. Then set aside. 


STEP TWO- Ingredients B: The stock

  • 1 1/2 cups of water 
  • 1 (10cm by 10 cm) sheet of dried seaweed
  • 7- 8 dried anchovies (you will need to de-head them and remove the innards)
  • 2 pieces of korean fish cake (slightly thaw it before using it)
Method: Put all ingredients in a cooking pot and boil over the stove top on medium heat.  Once it comes to a boil, reduce it to a low heat and boil for 5 minutes. Then remove the seaweed, anchovies and fish cake from the pot. You may discard the seaweed and anchovies. 

Allow the fish cake to cool before slicing it into 1cm by 6 cm strips. Then set aside. 

Keep the broth on a low simmer. 


STEP THREE- Ingredients C: The rice cakes and co

  • 325 grams  fresh rice cakes (The pack I purchased came in a pack of 650 grams)
  • Liberal amount of chinese cabbage (sliced into one centimeter strips)
  • 5 boiled eggs (shelled/ peeled)
With the broth on a low simmer, put in the chinese cabbage and allow for it to cook until softened. Then put throw in the fresh rice cakes with Ingredient A (the hot paste mixture). Stir occasionally to prevent the rice cakes from sticking to the bottom of the pot. 

You will note that the rice cake will thicken up sauce. If you find that the sauce is to thick add some water. However do test the saltiness of the sauce and adjust with salt to taste. 

Just before serving stir in the fresh boiled eggs and the fish cakes. Give it one last stir before turning off the heat. 

Serve while hot with fresh spring onions (aka green onions or scallions) and toasted sesame seeds. 

Notes
  • The korean hot pepper paste is chilli/ hot. Two tablespoons was sufficient for it to give a kick to the overall dish. If you are concerned, just use one tablespoon instead. 

Let me know what you think of this recipe and whether you would like to see more savoury recipes.. This recipe is my own hence it will not be authentic as I'm not of korean decent. If you are looking for something more authentic, do search up google for other recipes. 

Comment below if you have other questions. 

Happy Cooking!